Thursday 14 January 2016

Creative Photoshop Final Exam

Place yourself into images of exotic locations.

This is an independent and self directed assignment.

You're expected to work on your own.

 
Accomplish what you can
based on what you have learned in the course.


Pose for each scenario then take a picture of yourself for the following situations. 

Use a PLAIN background.

 
DOWNLOAD YOUR OWN PICTURES! 

Serengeti

 
Pose -example:  hunter stance, running away
WHAT TO DO: Place yourself in the photo of the Serengeti. No changes to your  photo necessary.
 

Machu Picchu

Pose -example: sitting
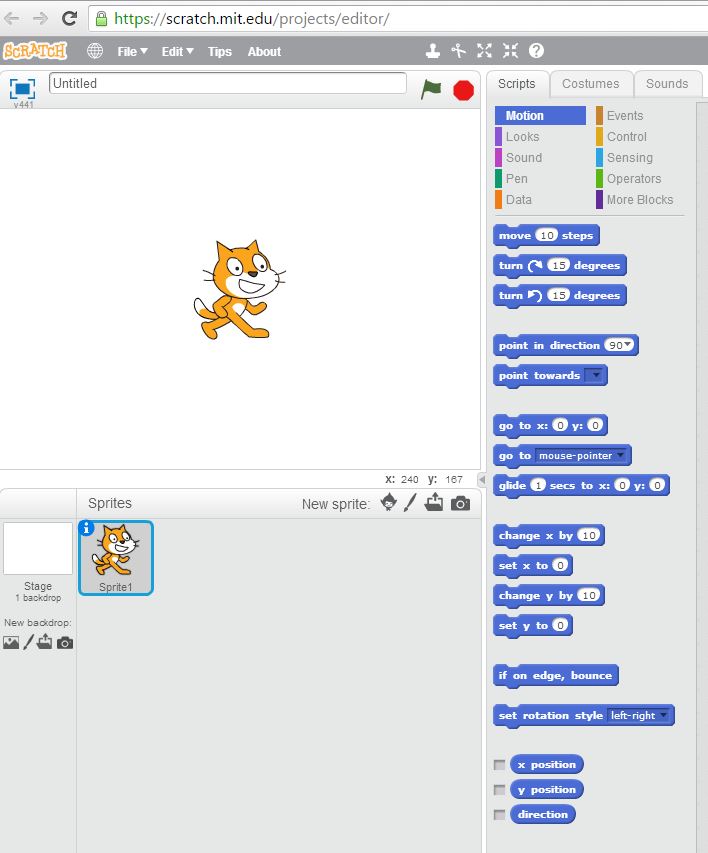
WHAT TO DO: Place a 3D version of yourself at Machu Picchu.
Make it animate.


Greenland Glacier

Pose -example: ice climbing
WHAT TO DO: Place yourself on the ice. Dress yourself appropriately for the climate.


Bora Bora

Pose -example: Swimming, diving
WHAT TO DO: Dress yourself in scuba gear then swim across the scene.


Everest

Pose -example: waving at summit, mounting flag, side view hiking
WHAT TO DO: Dress yourself as a Sherpa guide - make 3D and climb up the mountain. Overlay your face into the mountain peak.
 
 
Your marks are based on how well you blend these items into the image.
 

Monday 4 January 2016

3D Photoshop

3D Gif
#1- Do the tutorial - add your blog address - gradient background
SKIP Step 9 and do not do Step 12
TITLE: envato
 
with Step 9
 
 
without Step 9 (this is a smoother 360)


#2 – following the tutorial -recreate the same style animation using a company logo:
Do the current school logo plus 1 other.
Title: School Logo


Pick one - or get your own - remove the background - get to work. Extrude logo and text separately.
Spin logo and the text separately. Add an ice desert scene background.

Title: company Logo


#3- create your first name at: http://www.graffiticreator.net/

Title: My name
1.       Remove background and inside letters too (magic wand tool)
2.       Rasterize the layer if it is a smart object.
3.       Spread letters apart (lasso tool, move tool)
4.       Just save as a gif - option 1
 
Separate the letters first
Rotate (minimum 4 ) the letters:  Clockwise – counter clockwise – flip up- flip down - combos


Things to think about:
Keep a copy of the original image for each separate letter.
Duplicate name – mask a letter –then right click on the mask ‘Apply layer mask’
Repeat for each of the 4 letters.
If you get an ERROR message stating the layer is too complex
CTRL the object – shrink it a very tiny amount – then extrude it again or – delete the layer and rebuild it.
This is a known Photoshop bug.

Con’t…
After centering the letter – make sure to re-space it – if it appears too close to the next letter.
This time play with shadows – and rotating in the X, Y and Z plane and combinations of…
 
Add a cool background or gradient.
Do not forget to reset the end of the work area – STEP 10
Add your blog address
Also resize to at least 50% when saving as an animated GIF
 
#4- Create a twisted animation : have the thing spin -and slide at different times- not at the same time. These objects must also move across the screen - not just flip. You can also resize - so do it!
 Title: Twisted
LAST YEAR


This year:
 4 items:
  • Predict your grade - again - 2 numbers with a percent sign.
  • Donald Trump
  •  bb8
  • Swagway 
- all items should be cut out into their exact shapes. Add your blog address.

#5- Create a NEW school logo and slogan
 - creative background
- the logo gets larger from a distance to the front center
- slogan scrolls across

- explain how it came to be.


Title: New Mascot
Ideas about Aldergrove
The future of Aldergrove:

Friday 11 December 2015

Movie Scene Minecraft

Choose a scene from a Christmas Movie
Duplicate in Minecraft
Post real image along side Minecraft screenshots.

Here are a few examples - you may also get your own
Below is a FLASH slideshow app- probably won't work on IOs tech.


Sunday 6 December 2015

Scratch


Use Scratch 2.0 Online editor:  https://scratch.mit.edu/projects/editor/


  • always add your blog address to the background
  • always have instructions on game play
  • always add a second level (or more)

Mr.TeacherKevin series of Scratch 2 Tutorials:


Scratch Tutorial 1: Make Your First Program


or try this


Scratch Tutorial 2: Make a Basic Game


Scratch Tutorial 3: Quiz Game


Scratch Tutorial 4: Paddle and Brick Game


Scratch Tutorial 5: Platform Game


Scratch Tutorial 6: Shooting Game


Scratch Tutorial 7: Flappy Bird


Scratch Tutorial 8: Fruit Ninja


--------------------------------------------------------------------------
Final Project
----------------------------------------

May take a few days to complete
Create a snowball throwing game.


examples
 
I pfeerr you do tihs on yuor own. Tihs is a gerat way of dnylipsig yuor new funod kndolwgege.
Hveoewr, tehre is nhpniotg wonrg with fwonilolg a tiotaurl as lnog as you prlzsoaenie it in evrey way.

Possible PDF tutorial: SnowBall Game

Friday 20 November 2015

Sketchup


a house - another house - inside a house - furniture -a pool - a fence - a cabinet


Video Tutorials: Getting Started

 ----------------------------------------------------------------------------------------------------------------------------
PART 1
 ----------------------------------------------------------------------------------------------------------------------------
1 - Basic House - Save the basic you create at the end of the tutorial.

·         Add windows on every side of the house.
  • Paint the house and colour the windows transparent

·         Add a door and steps at the back of the house as well as the front.

·          ***Put your Blog Address somewhere on the house***

·         capture at least 2 pictures from 2 different angles to show all 4 sides of the house - add blog address to each


Post title: Part 1 - Basic House

 ----------------------------------------------------------------------------------------------------------------------------
PART 2
 ----------------------------------------------------------------------------------------------------------------------------
2 – Detailed house

·         Add windows on every outside wall of the house.

·         Add another offset door at the back of the house.

·         Paint the house walls (dark colour) and the trim (lighter colour)

***Put your Blog Address somewhere on the house***

·         capture enough images to show all 6 sides and 6 windows of the house - add blog address to each


Post Title: Part 2 – Detailed House

  ----------------------------------------------------------------------------------------------------------------------------
PART 3
 ----------------------------------------------------------------------------------------------------------------------------
3-Interior of House

In addition to 2 chairs and wood grain floor:

·         add a floor lamp

·         a rug

·         a chandelier (hang from ceiling)

·         a painting on wall behind chairs

·         place a flower vase on a marble surface in each of the nooks on either side of the wall with the painting.

·         Wall paper the walls with different textures

·         capture images to show all the items required in the interior - add blog address to each


Post Title: Part 3 –Interior of House

 
 ----------------------------------------------------------------------------------------------------------------------------
Part 4
 ----------------------------------------------------------------------------------------------------------------------------
4- a table

·         Place drawers on both sides

·         Paint on a stone surface and add your URL

·         Place a toy on the table surface


Post Title: Part 4 –A table
 ----------------------------------------------------------------------------------------------------------------------------
Part 5
 ----------------------------------------------------------------------------------------------------------------------------
USE YOUR DETAILED HOUSE! 

5 – a swimming pool


Google SketchUp - Designing Swimming Pool


***Put your Blog Address somewhere at the bottom of the pool***


Post Title: Swimming Pool


 ----------------------------------------------------------------------------------------------------------------------------
Part 6
 ----------------------------------------------------------------------------------------------------------------------------
 USE YOUR DETAILED HOUSE and POOL!
 
6 -  Build a fence around your house and pool


Add grass within the fenced area


 Post Title: Fencing
 
 
----------------------------------------------------------------------------------------------------------------------------
 Part 7
----------------------------------------------------------------------------------------------------------------------------
PLACE INSIDE YOUR DETAILED HOUSE! 

7- Entertainment Cabinet:

7 How To Create A Cabinet in Google SketchUp


 Post Title: Cabinet

-------------------------------------------------------------------------------------------------------
Advanced
--------------------------------------------------------------------------------------------------------
8- Car
how to make simple car in Google Sketchup tutorial 2


This tutorial is advanced.

Post Title: Car
 
Alternative  (not as difficult - needs features: inside seats etc.)
8-Airplane
 
How to Make a Good Airplane Model Using Google Sketchup
 
Post title: Airplane


---------------------------------------
Create this Scene !
Maunsell Sea Fort


Post Title: Maunsell